How to silence an Odroid XU4
 I love these little single-board computers. They’re small, cheap, energy efficient, powerful, extremely versatile, have several digital and analog I/Os and… generate the fan noise from hell! In this tutorial I will demonstrate how I modded my Odroid XU4 to make it (almost) unhearable.
Used parts
Ok, first things first… If you follow this tutorial you are doing this strictly at your own risk. If you accidently damage your XU4 during the construction or your XU4 dies from overheating after following this tutorial, I will take no responsibility whatsoever, got it? You are doing this at your own risk.
Alright, now that we’ve got this straight, let’s go for it… Here are the parts I used:
- Odroid XU4 (obviously)
- ~40x40mm aluminium heat sink
- 40-to-60mm fan adapter
- 60mm fan running on 5V
- thermally conductive pads
- Philips screw driver, pliers, scissors, ~15cm of isolated wire, some sticky tape
I got a set of 5 black coated aluminium heatsinks (37x37x37mm) that are intended to be used as Power-LED heatsinks from eBay, as well as a set of three 60mm fans that run on 5V. It is essential that you get fans that run on 5V! Also, I ordered three 40-to-60mm non-centric fan adapters from alternate. You can get centric fan adapters, but I’d definitely recommend non-centric ones, so the whole setup at the end won’t exceed the board’s outline. Last, but not least, I got some thermally conductive pads (also from alternate) with a reasonably high thermal conductivity.

Used parts
Step 1: Remove heatsink
First get rid of the annoying little noisy fan. Pull the fan’s power connector off the board. On the lower side of the XU4, sqeeze the white pins that hold the fan together and gently, but firmly, push then out of the board. After that, carefully take off the silver heatsink with the fan. I used a small screw driver, put it under the fan and used the I/O connector and the HDMI connector as leverage points to lift the heatsink off the board.

Odroid XU4 without heatsink
Step 2: Build up the new heatsink
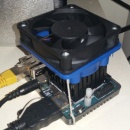
Next I built up the new heatsink with fan adapter and fan. You should receive some screws, nuts and shims with the fan adapter. Use those to mount the adapter to the heatsink and the fan to the adapter. When mounting the fan, only mount two diagonal holes for now. We’ll take care of the other two in a minute. Make sure the power cable of the fan points towards the overlaping side of the fan adapter, since this is the side which will be above the fan’s power connector when we mount the whole thing to the XU4.

Heatsink, fan adapter and fan
Since we cannot mount this construction directly to the XU4 we need to find a workaround. This is where the isolated wire comes in. Split the wire in two parts of the same length. Now put in the screws to mount the fan to the fan adapter and put one shim on the lower side of the fan adapter. Make a slope in the wire, put it over the srew and tighten the knot. Put another shim on top of that and use a nut to hold everything in place. We will use these wires to bind the heatsink to the board later.

Wires on fan adapter
Almost done. We now need to wire the power cable of the original XU4 fan to the new one. On the new fan, cut the power cord about 10cm from the fan. Remove the power cord from the original fan. Remove the isolation from the wires, about 3mm should do it. Now connect the original fan’s wire to the new fan’s power cord (black to black, red to red) and use some sticky tape to isolate the connection. If you have some heat shrink tube, use those.

Power cord connection
Mount the new heatsink
Alright, now that we’ve got the heatsink set up, it’s time to apply the thermally conductive pads and mount this beast to the XU4. The thermally conductive pads I ordered came in two stripes of 120x20mm, so they fit perfetly under the heatsink. I cut two peaces of 40x20mm off a big stripe and applied them to the heatsink. Since the XU4’s CPU is at the outer edge (see second image above, the big black block next to the HDMI connector), I put the pad across, not lengthwise (see image below).

Apply thermally conductive pads
I also wanted to put the XU4 in the case that came with it, well, at least the lower part. I had to drill an extra hole in the bottom of the case so I could get the wire through to mount the new heatsink. When you put the heatsink on the XU4, make sure the thermally conductive pad covers the whole CPU, otherwise heat spikes can arise and damage the CPU. Use the isolated wire to keep the heatsink in place by wrapping, twisting and knoting the wires to the board and the case. And don’t forget to connect the fan’s power cord.

Mounted heatsink
Fan control software
Of course, this wouldn’t be a Linux M0nk3ys post if we wouldn’t tweek some software, so let’s go for some advanced fan control.
First let’s have a look at some system files concerning the fan.
You can find out the current CPU temperature for all 4 cores plus the GPU with
$ cat /sys/devices/10060000.tmu/temp
sensor0 : 45000
sensor1 : 44000
sensor2 : 48000
sensor3 : 47000
sensor4 : 45000
The fan’s system files are located in /sys/devices/odroid_fan.13/. To control the fan, we only need two files, fan_mode to get/set automatic or manual fan control, and pwm_duty to get/set the fan speed. Note that this is a relative value. The actual fan speed depends on the maximum speed of your fan. The fan speed can be calculated by
$ MY_FANS_MAX_SPEED=2100
$ PWM_VALUE=$(cat /sys/devices/odroid_fan.13/pwm_duty)
$ echo "scale=2; $MY_FANS_MAX_SPEED*$PWM_VALUE/255" | bc
16.47
For the next part I used software from f1vefour/odroid-xu4-fan-control on GitHub to control the fan speed. I only modified the while-loop in odroid-xu4-fan-control.sh to get a more linear and ascending/descending fan speed control and some other minor things. Check out f1vefour’s code and replace odroid-xu4-fan-control.sh with the following:
#!/bin/bash

# Loud fan control script to lower speed of fun based on current
# max temperature of any cpu
#
# See README.md for details.

#set to false to suppress logs
DEBUG=false

# Make sure only root can run our script
if (( $EUID != 0 )); then
   echo "This script must be run as root:" 1>&2
   echo "sudo $0" 1>&2
   exit 1
fi

TEMPERATURE_FILE="/sys/devices/10060000.tmu/temp"
FAN_MODE_FILE="/sys/devices/odroid_fan.13/fan_mode"
FAN_SPEED_FILE="/sys/devices/odroid_fan.13/pwm_duty"
TEST_EVERY=1 #seconds
LOGGER_NAME=odroid-xu4-fan-control

MIN_TEMP=45000
MAX_TEMP=75000
MIN_PWM=64
old_pwm=2

#make sure after quiting script fan goes to auto control
function cleanup {
  ${DEBUG} && logger -t $LOGGER_NAME "event: quit; temp: auto"
  echo 1 > ${FAN_MODE_FILE}
}
trap cleanup EXIT

function exit_xu4_only_supported {
  ${DEBUG} && logger -t $LOGGER_NAME "event: non-xu4 $1"
  exit 2
}

if [ ! -f $TEMPERATURE_FILE ]; then
  exit_xu4_only_supported "a"
elif [ ! -f $FAN_MODE_FILE ]; then
  exit_xu4_only_supported "b"
elif [ ! -f $FAN_SPEED_FILE ]; then
  exit_xu4_only_supported "c"
fi

current_max_temp=`cat ${TEMPERATURE_FILE} | cut -d: -f2 | sort -nr | head -1`
echo "fan control started. Current max temp: ${current_max_temp}"
echo "For more logs see:"
echo "sudo tail -f /var/log/syslog"

while [ true ];
do
  current_max_temp=`cat ${TEMPERATURE_FILE} | cut -d: -f2 | sort -nr | head -1`
  ${DEBUG} && logger -t $LOGGER_NAME "event: read_max; temp: ${current_max_temp}"

  if (( ${current_max_temp} >= ${MAX_TEMP} )); then
    pwm=255
  elif (( ${current_max_temp} >= ${MIN_TEMP} )); then
    pwm=$(echo -e "scale=10; (${current_max_temp} - ${MIN_TEMP}) *\
     (255 - ${MIN_PWM}) / (${MAX_TEMP}-${MIN_TEMP}) + ${MIN_PWM}" | bc |\
     sed "s/\..*//g")
  else
    pwm=2
  fi
  if (( ${pwm} != ${old_pwm} )); then
    echo 0 > ${FAN_MODE_FILE} #to be sure we can manage fan
    ${DEBUG} && logger -t $LOGGER_NAME "event: adjust; speed: ${pwm}"
    if (( ${old_pwm} < ${pwm} )); then
      for (( i=${old_pwm}; i<=${pwm}; i++ )); do
        echo ${i} > ${FAN_SPEED_FILE}
      done
    else
      for (( i=${old_pwm}; i>=${pwm}; i-- )); do
        echo ${i} > ${FAN_SPEED_FILE}
      done
    fi
    old_pwm=${pwm}
  fi
  sleep ${TEST_EVERY}
done
For the rest of the setup procedure, please follow the instructions in the README.md from f1vefour.
I know, the whole fan replacement procedure takes some time and the parts also cost a few bucks, but it’s definitely worth the effort. I’m running my media server on the XU4 and with the new heatsink and fan I usually don’t hear a single sound from this thing.
I hope you enjoyed this little hardware tinkering. Have a nice weekend, y’all!
Posted on May 6, 2016, in Hardware, Odroid and tagged configuration, odroid, troubleshoot. Bookmark the permalink. 1 Comment.

Pingback: oDroid XU4 Lüfter und Kühlkörper Austausch » blaumedia